Are you still searching for that leak through which your money keeps flowing away? Maybe, the answer is not that far. Maybe it is sitting next to you, playing the latest version of Minecraft!
Sooner or later, every parent begins to wonder how to stop their children from buying an enormous amount of games on the Internet or at least block in-app purchases. Is it really possible if all conversations to end up in nothing?
The answer is YES. If your kiddo keeps nodding along shamefully while you’re pointing out the amount of money he spends every month on games, but the next month’s situation is just the same, maybe it’s time to go off the “high road.”
Here is our simple guide on how to control your kid’s spending on iPhone and Android so that you can find yourself a bit of peace of mind.
How to enable Ask to Buy on an iOS device?
With the “Ask to buy” option, you give your kids the freedom to make their own choices but still control what they’re buying and make the final decision. It works along with “Family sharing”: every time a kid initiates a purchase in App Store, iTunes, Apple Books, in-app, or iCloud, the notification goes into the family organizer. That’s where you can approve or disapprove the purchase. If you approve, it will proceed automatically. If you don’t, no purchase or download will be completed. If your child downloads the same app or updates, you won’t receive a notification.
“Ask to buy” works for any family member under 18. When inviting anyone under 18 to your family group, you’ll be asked to set up “Ask to buy” for them. For children under 13, this option is enabled automatically.
Here is a quick guide for setting up the “Ask to buy” feature in your family organizer.
- Go to Settings > Apple ID
- Go to “Family Sharing”
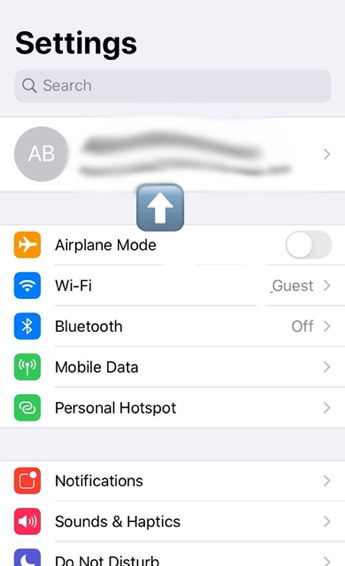
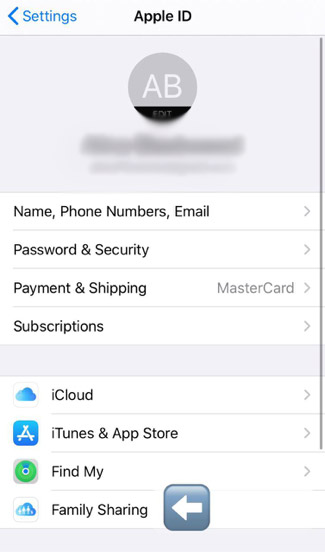
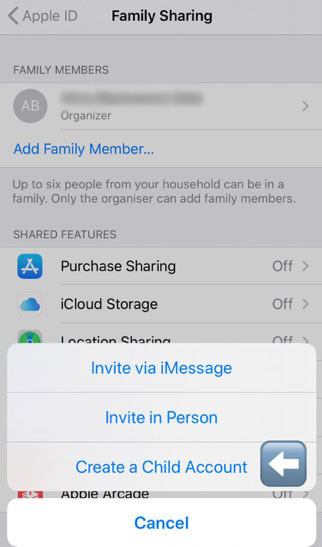
- Click on “Add Family Member” and choose “Create a Child Account”
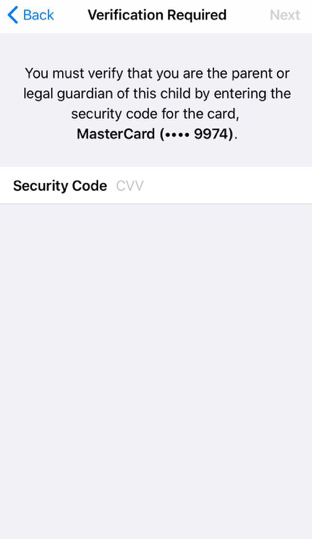
- In order to confirm you’re the parent, you’ll need to provide your payment information, and Apple kindly warns you about that
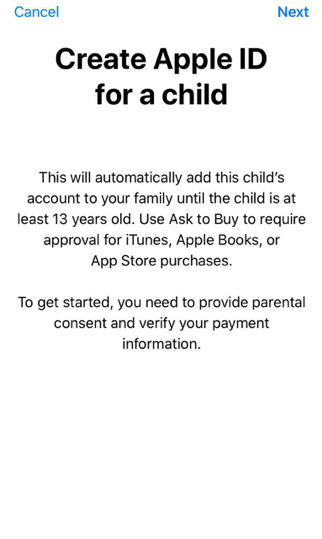
- Enter your security code for the bank card
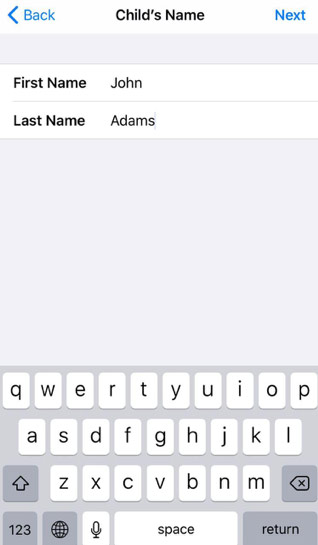
- Enter your child’s name and last name
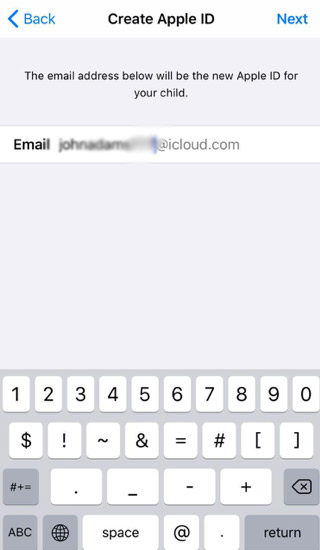
- Create an Apple ID for your kiddo. Make sure the name isn’t occupied.
- Enable “Ask to Buy” option as suggested. If your kid is under 13, it will turn on automatically.
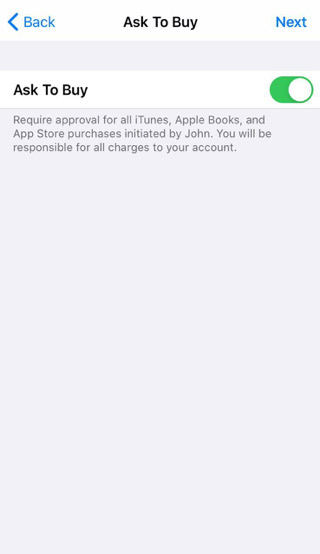
Here you go! Now every time your child is up to buying some game or making an in-app purchase, you’ll be receiving a notification asking for your approval.
How to Prevent Unauthorized In-App Purchases on iOS
Another way to prevent kids from spending an uncontrollable amount of money on in-app or other Apple purchases is by adjusting their device settings.
You can use Screen Time even if you don’t have access to your kid’s phone. Since you’ve created your kid’s Apple ID as guided above, you can instantly set up restrictions on his/her device. Use Screen Time, where you can set a password for purchases, disable a particular type of purchase, or switch off all the purchases completely.
Follow the steps below.
- Go to Settings > Screen Time
- Choose your kid’s device where you’ll be making settings
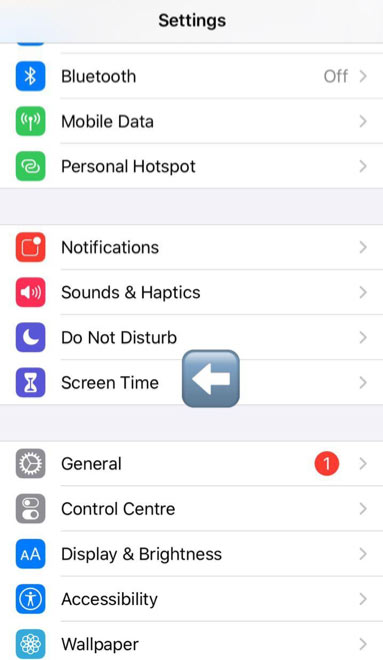
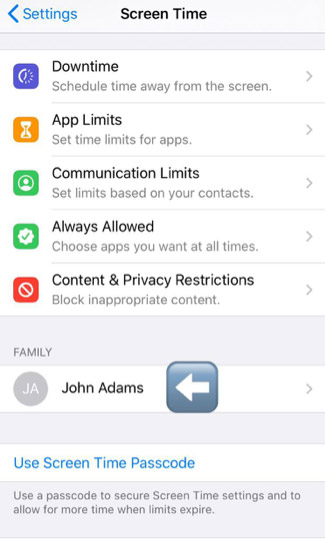
- Once there, click on “Turn On Screen Time”
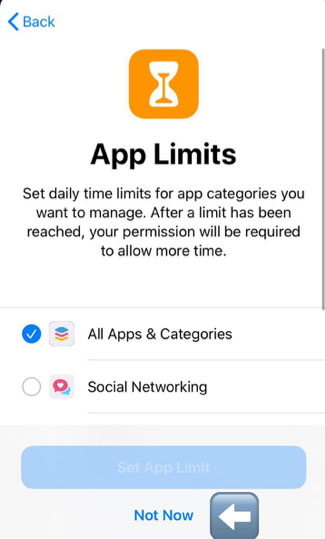
- Tap “Continue”
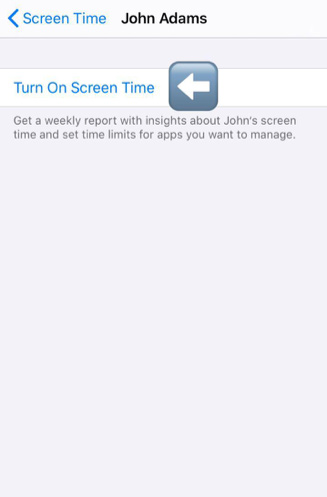
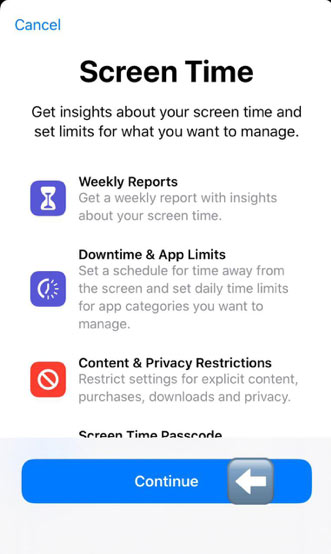
- Tap “Not now”
- Tap “Continue”
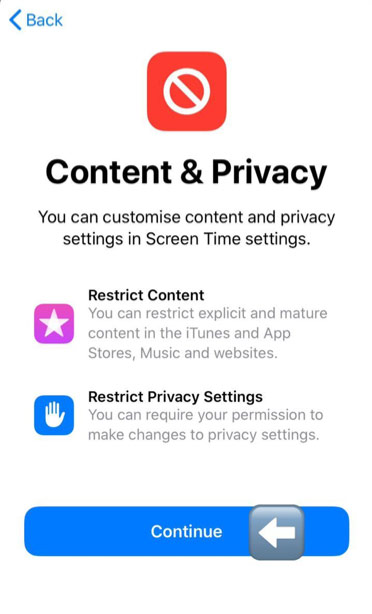
- Set up a password of 4 symbols
- Now go back and click on “Content & Privacy Restrictions”
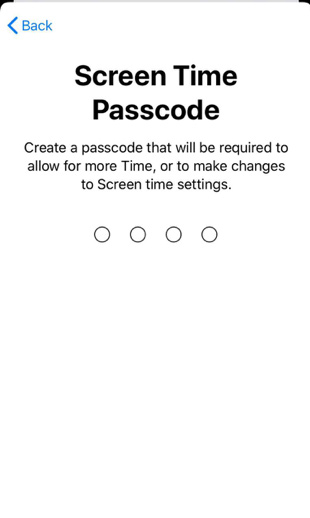
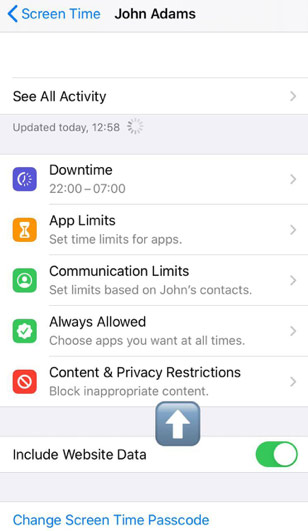
- Enter the code you’ve created
- Enable “Content & Privacy Restrictions”
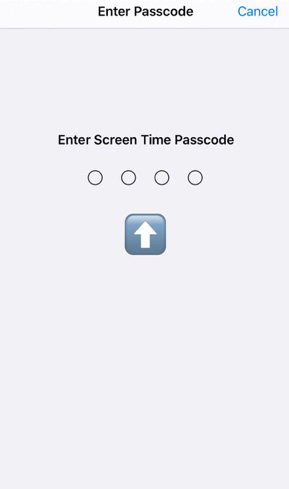
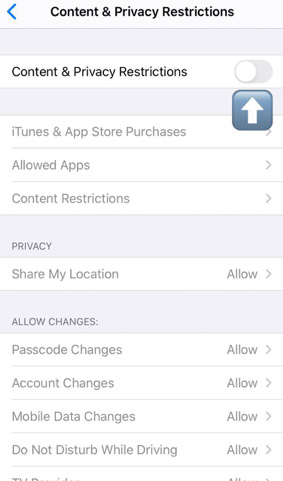
- Go to “Itunes & App Store Purchases”
- Choose “In-app Purchases”
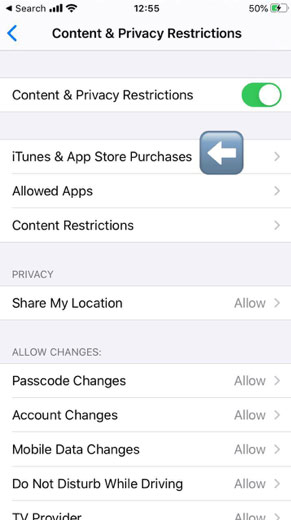
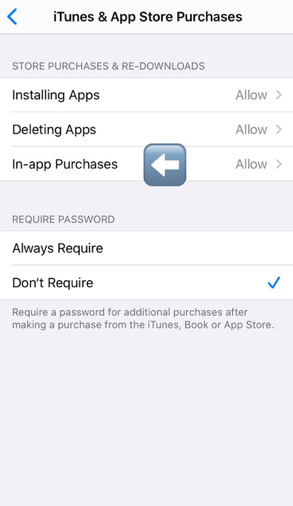
- Tap “Don’t Allow”
- You can also opt for “Always Require” if you want the password to be required each time the purchase is initiated
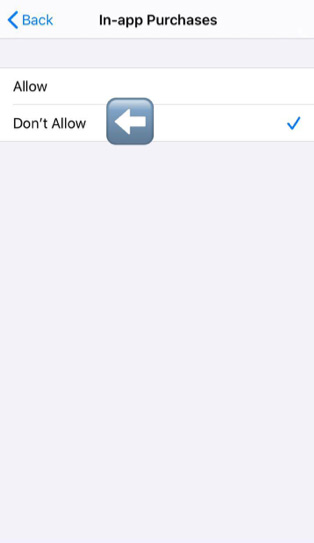
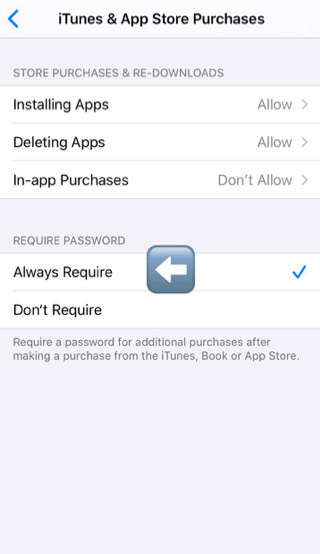
Voilà! You’ve successfully disabled all the purchases on your kid’s phone. If you haven’t created his Apple ID, you can go through the same steps on his/her phone.
How to view in-app purchases on iPhone?
In-app purchasing stands for the buying of goods and services inside the app. They can be extra points in a game, bonus levels, ads removal, or updates for the latest versions. Once you’ve provided a credit card number, each time the next update or “unlock a new character” pops up, you can click on “agree”, and the fee will be automatically charged from the associated card. That’s why it’s sometimes hard to track all your spending because they take place naturally as you’re improving in your game.
If your kid is really into games, and you’re having a hard time convincing them to pay attention to some other things except the screen of the phone, then it may be difficult for you to set up control over their online activities.
In this case, parental control apps may be the option. It allows you to monitor online purchases made by your kid instantly and also have a clue of what’s going on in their lives. If you own the phone that your kid is using, you can do it completely anonymously.
How to turn off in-app purchases on Android?
In case your child owns an Android device and you have access to it, do the following:
- Go to Play Store > Settings
- Go to Parental Controls
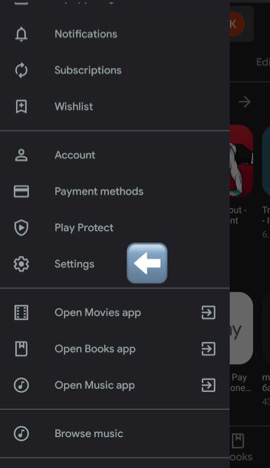
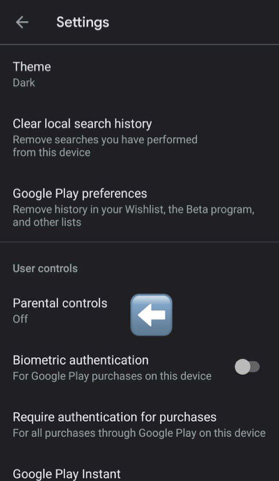
- Enable Parental Controls
- Create a PIN code that will be used each time a purchase is initiated
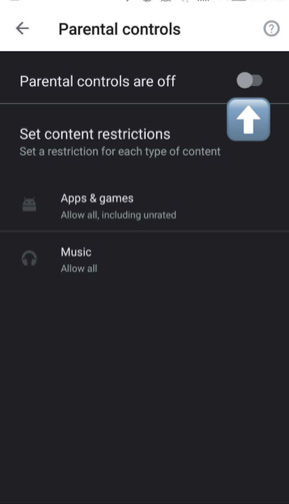
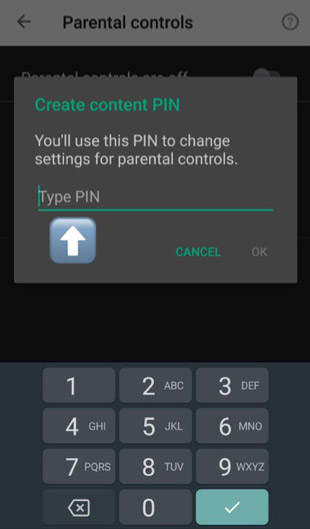
Activating Google’s account protection measures
You can also limit down all purchases made through Google Play if you have access to your kid’s device. To do that, make the following:
- Go to Play Store > Settings
- Go to “Require authentication for purchases” and enable it.

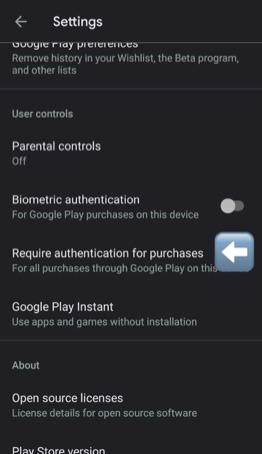
Parental control apps for monitoring your kid’s phone
Many parents prefer third-party apps for monitoring their kids’ online activities and limit the amount of money they can spend on games and other apps.
Parental control software allows you not only to get access & control over your kid’s online spending but also invisibly tap into their chats, view their contact book, and scroll through their website history. You can say it’s an all-in-one solution if you want to be aware of what your kid’s up to online.
Any parental control app is packed with unique features designed for different purposes. If you want all in one place, there are some solutions that let you extend your control over almost all existing online activities.
For example, with the help of such an app, you can:
- See your kid’s GPS location on the map;
- View website history and track websites where your kids spend most of their time;
- Track their social media activities: Instagram, Facebook, Snapchat, Twitter, Tinder, etc.;
- Sneak into chats and view all SMS: sent, received, even deleted;
- View contact book;
- Get access to messengers, including files exchanged there;
- Look through the photo gallery;
- Block in-app purchases;
- Install web filter and block adult websites;
- Make screenshots on the target device.
Such powerful solutions as uMobix, for instance, let you access the target device in just a few seconds. With it, parents own their userspace, where all the data are loaded and organized neatly in comprehensive dashboards. The data is renewed every 10 minutes, and a parent receives a notification each time a suspicious event takes place.
For less than $1 a day, you can be sure your kid’s online activities are under control. Learn more.
FAQ
“Screentime” is a useful feature that’ll allow you to prevent unintentional in-app purchases.
1. Go to Settings > Screen Time;
2. Tap “Content & Privacy Restrictions”;
3. Go to iTunes & App Store Purchases;
4. Go to In-app Purchases;
5. Tap “Don’t allow”.
If you’ve just bought a cell phone/tablet for your kid, the timing is perfect: you can create an Apple ID for your kid using your phone and invite them to your family group. If your kid is under 13, you’ll automatically control all the purchases they initiate and decide whether to buy a particular game/app or not.
You’ll receive a notification telling you about your kid’s intention along with two options: approve or decline. Then it’s totally up to you.
If your kid is 13+, you can adjust settings and enable parental control by yourself. To know the steps you need to take, scroll to the top of this article and see detailed instructions.
If the message says, “Your account has been disabled”, — then you might probably have troubles with the payment method you’ve chosen. In this case, don’t change any information there, and get help from the support center.
If you don’t know or forgot your Screen Time password, you can reset it with an iPhone backup extractor.
- Download backup extractor and install it (compatible with Windows & Mac);
- Connect your iPhone with USB;
- Go to “Utilities” and find “Screen Time Password”;
- Open the wizard and follow the instructions.
Latest posts
- 10 Best Apps for Parents to Monitor Social Media: 2026 Guide
- Complete List of Keywords to Block for Parental Control
- Does Telegram Notify Screenshots? Everything About Screenshot Detection
- How to Find Someone’s Deleted Instagram Posts: Complete Guide
- Family Tracking App by uMobix: Keep Loved Ones Safe


